

What You Need:

- Memory Wire
- Beads in 2 Colors (I used 6/0 Czech Glass Beads)
- Round Nose Pliers
- Wire Cutters (hardware store ones, NOT ones made for jewelry)
How To Make It:
See photos below
- Use your wire cutters to cut 7 full rounds of memory wire.
- Cut one of the rounds in half and create a small loop at one end of each with your round nose pliers (make sure to tighten the loop all the way down).
- Use round nose pliers to make a small loop at the end of each of the 6 of remaining rounds of memory wire to keep the beads on the wire. Make sure to tighten the loop down so it is completely closed.
- String 3 rounds of wire with one color beads and 3 rounds of wire with second color beads.
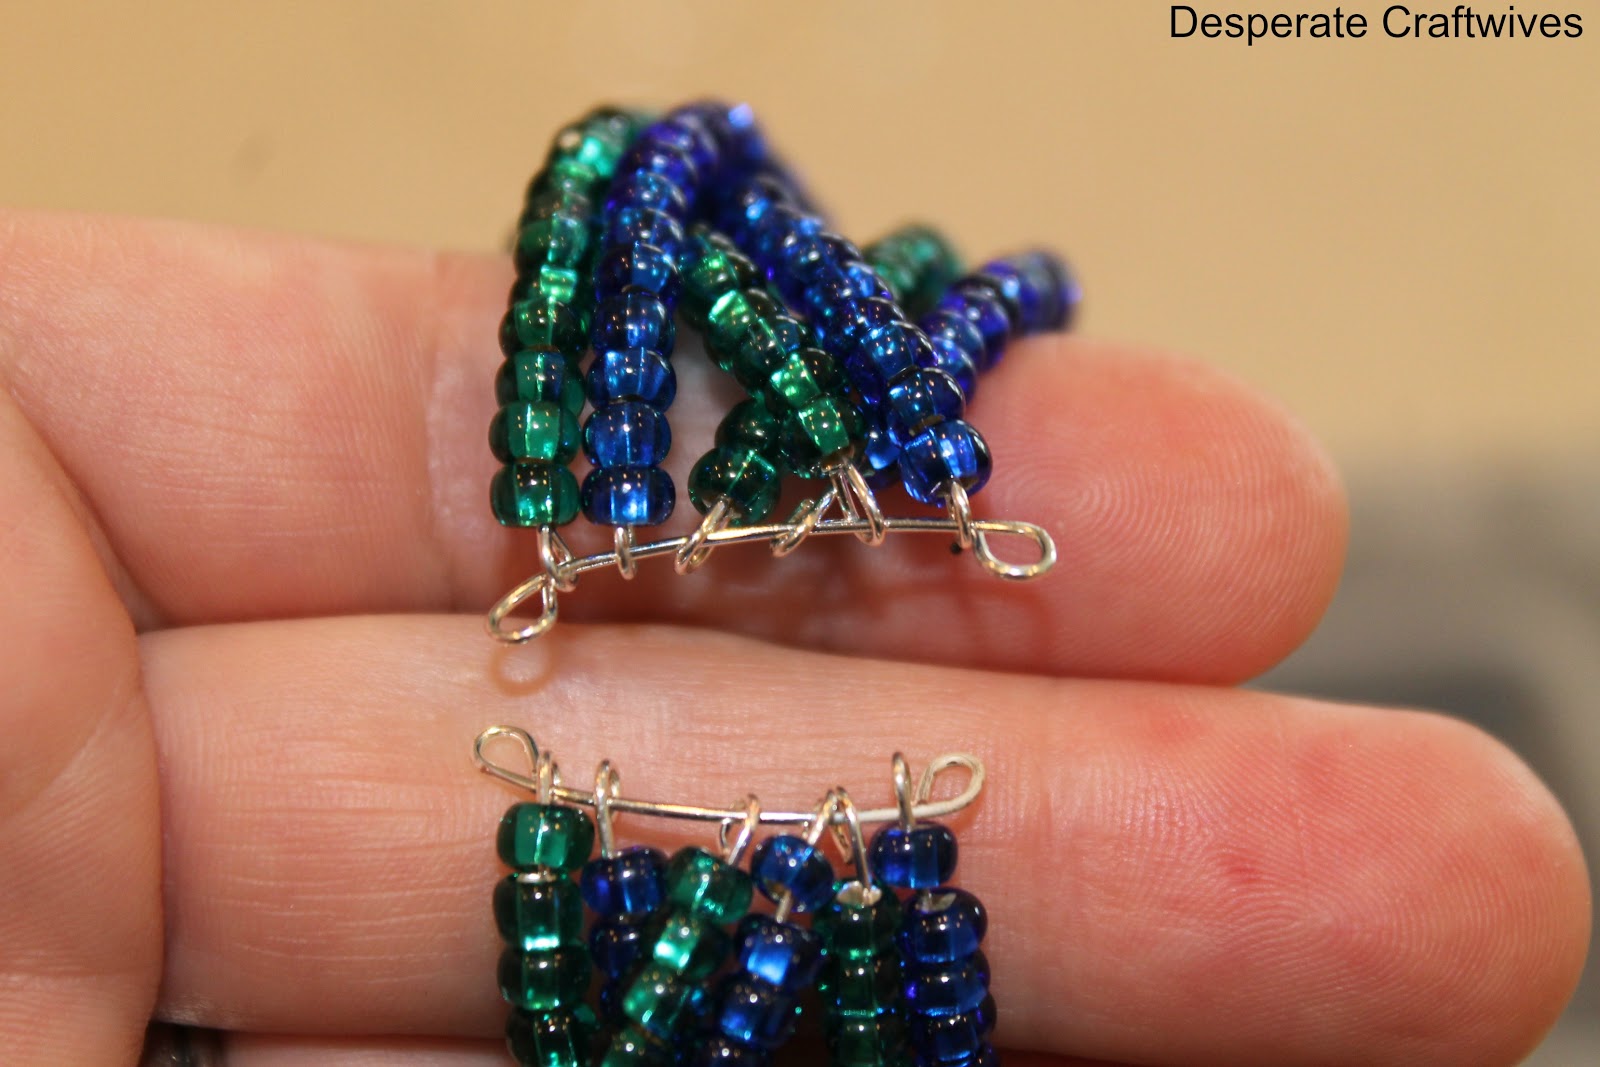
- At the end of each round of wire, you will want to leave about a pinky finger's width with no beads and use your round nose pliers to create another small loop at the end (tightened down) to keep beads on the wire.
- Next, line the rounds up in alternating colors. For me it is blue, green, blue, green, blue, green.
- With the small loops at the end of each round lined up, take one of the half rounds you made earlier and string it through all the loops (in order). Trim the end to about a pinky-width and use round-nose pliers to form another loop at the end.
- Separate into 3 parts (blue/green - blue/green - blue/green) and braid.
- Once braided, keep ends in order and string the other half round through the ending loops. Trim off excess and seal with another small loop at the end.


Pretty easy, huh?!
Of course, if you aren't feeling up to it, you can always buy one from my Etsy Shop ;)


Hope you've enjoyed this tutorial and are feeling inspired! I've got lots of great tutorials to share, so I'd love it if you'd follow along!
-Blythe
Places I'm Partying:


Hi! New follower from Shine on Fridays. You have such a cute blog name!!!
ReplyDeletehttp://www.sewingourlifetogether.blogspot.com
Aha! I was wondering how you secured the ends. Nice one. Pinning!
ReplyDeleteI love these, I especially love the blue and green. Excellent job with your tutorial. Thanks!
ReplyDeleteMikaila at alittlebitofcraft.blogspot.com
I love the blue and green one--I could easily jazz up a t-shirt with it... then the brown one at the bottom looks really elegant: perfect for a fancy dinner!
ReplyDeleteI used to make jewelry with my mom just for fun (probably 5th or 6th grade :)). I'll have to see if she still has her tools!
Thanks for sharing!
Christine
I love this bracelet!! I am thrilled to be your 300th follower!! CONGRATS!!!
ReplyDeleteLove this project. Thanks so much- I'm going right out to make one! Joining from Shine on Fridays - http://allthoseartsygirls.blogspot.com/
ReplyDeleteVery pretty...may try one real soon...Thanks for the great tutorial.
ReplyDeleteYes LOVE this! Had a coworker request a bracelet for her sister for Christmas and I am hoping she picks this- if not, I might just have to make a few myself anyway.
ReplyDeleteThanks so much for sharing!
Nice and cute beads. Blue is my favorite color. I like it and your blue color beads is really looking good. Thanks
ReplyDeleteBead Caps
Oh! I just love the blue and green bracelet. It looks like a wave of cooling water on a hot summer day. Going to have to make me one just like it. Thanks so much for sharing your wonderful and easy pattern. Excellent job!
ReplyDeleteJust found you! This is amazing!
ReplyDeleteHi,
ReplyDeleteThanks for the great details, i have bookmarked your blog for the future upcoming post.
We are leading manufacturers & suppliers of Braiding Wire, MIG Wire, Nail Wire, Weaving wire
Help! I sure appreciate your above video but I need some help. I braided 3 strands only (didn't want large cuff) and nearly drove myself nuts trying to finish the ends. Had my hubby hold one end while I seriously wrestled the other end and they still look awful .... the finishing wires (horizontal) are all scrunched as opposed to your pretty, calm closures. Any suggestions would sure be appreciated ... Thanks.
ReplyDeleteThank you so much for posting such a thorough tutorial! I've been looking for a good diy cuff bracelet tutorial for a couple of weeks, and this is by far the most complete; bookmarked and Pinned!!!
ReplyDeleteTHANK YOU SO MUCH! This is extraordinarily generous of you to take the time to share a tutorial for such a beautiful bracelet! I'll be keeping my fingers crossed for your home team in appreciation!
ReplyDeleteThere is a safe & effective Natural Herbal Medicine. For Total Cure Call +2349010754824, or email him drrealakhigbe@gmail.com For an Appointment with (Dr.) AKHIGBE contact him. Treatment with Natural Herbal Cure. For:Dengue Fever, Malaria. Painful or Irregular Menstruation. HIV/Aids. Diabetics. Vaginal Infections. Vaginal Discharge. Itching Of the Private Part. Breast Infection. Discharge from Breast. Breast Pain & Itching. Lower Abdominal Pain. No Periods or Periods Suddenly Stop. Women Sexual Problems. High Blood Pressure Chronic Disease. Pain during Sex inside the Pelvis. Pain during Urination. Pelvic Inflammatory Disease, (PID). Dripping Of Sperm from the Vagina As Well As for Low sperm count. Parkinson disease. Obesity, Lupus. Soreness/Injury Cancer. Tuberculosis. Zero sperm count. Bacteria, Impotence Fertility,Protoplasmic, Diarrhea. Hepatitis A&B, Rabies. Asthma. Quick Ejaculation. Gallstone, Cystic Fibrosis, Schizophrenia, Crubs, Cirrhosis, Premature Ejaculation. Herpes. Joint Pain. Stroke. Cornelia Disease, Weak Erection. Ovarian problem, HeartBurn, Erysipelas, Thyroid, Relapsing polychondritis, Discharge from Penis. Bronchial Problem, HPV. Hepatitis A and B. STD. Smallpox, Staphylococcus + Gonorrhea + Syphilis. Heart Disease. Pile-Hemorrhoid.rheumatism, Impotence, thyroid, Autism, Depression, Sepsis Bacteria, Penis enlargement, Prostate Problem, Waist & Back Pain. Male Infertility and Female Infertility. Etc. Take Action Now. contact him & Order for your Natural Herbal Medicine: +2349010754824 and email him drrealakhigbe@gmail.com Note For an Appointment with (Dr.) AKHIGBE.I suffered in Cancer for a year and three months dying in pain and full of heartbreak. One day I was searching through the internet and I came across a testimony of herpes cure by doctor Akhigbe. So I contacted him to try my luck, we talked and he sent me the medicine through courier service and with instructions on how to be drinking it.To my greatest surprise drinking the herbal medicine within three weeks I got the changes and I was cured totally. I don't really know how it happens but there is power in Dr Akhigbe herbal medicine. He is a good herbalist doctor.
ReplyDeleteThank you so much!! I tried making one before but instructions called for using head pins for the attachment bar. But the memory wire is very strong and bends the head pin. This make so much sense! Now I can close my patriotic bracelet!
ReplyDelete